
MySQL server is a free open source and cross-platform database management system. MySQL server supports both SQL and NoSQL. It can be done with multiple database connectors for different programming languages. MySQL server is also used for LAMP, Cloud, Hadoop as well as for websites and apps. In this article, we will explain a fresh Install MySQL Server on Ubuntu.
What’s New Features in MySQL:
- New backup lock
- Many changes in InnoDB
- Advanced Resource Management
- Increase Security and Account Management.
- The database contains the transaction data dictionary.
- Increase Optimizer
- Increase MySQL Replication
Follow the below Steps to Install MySQL in Ubuntu:
Add & Install MySQL Apt Repository:
Here is the APT repository for the MySQL server. Need to add the MySQL repository here to the package source list. Use the wget tool command to download the repository package.
itsmarttricks@mangesh:~$ wget -c https://dev.mysql.com/get/mysql-apt-config_0.8.10-1_all.deb
--2018-08-19 13:02:08-- https://dev.mysql.com/get/mysql-apt-config_0.8.10-1_all.deb
Resolving dev.mysql.com (dev.mysql.com)... 137.254.60.11
Connecting to dev.mysql.com (dev.mysql.com)|137.254.60.11|:443... connected.
HTTP request sent, awaiting response... 302 Found
Location: https://repo.mysql.com//mysql-apt-config_0.8.10-1_all.deb [following]
--2018-08-19 13:02:10-- https://repo.mysql.com//mysql-apt-config_0.8.10-1_all.deb
Resolving repo.mysql.com (repo.mysql.com)... 104.85.137.219
Connecting to repo.mysql.com (repo.mysql.com)|104.85.137.219|:443... connected.
HTTP request sent, awaiting response... 200 OK

The file is already fully retrieved; nothing to do.
Now use the following dpkg command to install MySQL repository package.
itsmarttricks@mangesh:~$ sudo dpkg -i mysql-apt-config_0.8.10-1_all.deb
[sudo] password for itsmarttricks:
(Reading database ... 128166 files and directories currently installed.)
Preparing to unpack mysql-apt-config_0.8.10-1_all.deb ...
Unpacking mysql-apt-config (0.8.10-1) over (0.8.10-1) ...
Setting up mysql-apt-config (0.8.10-1) ...
Warning: apt-key should not be used in scripts (called from postinst maintainerscript of the package mysql-apt-config)
OK
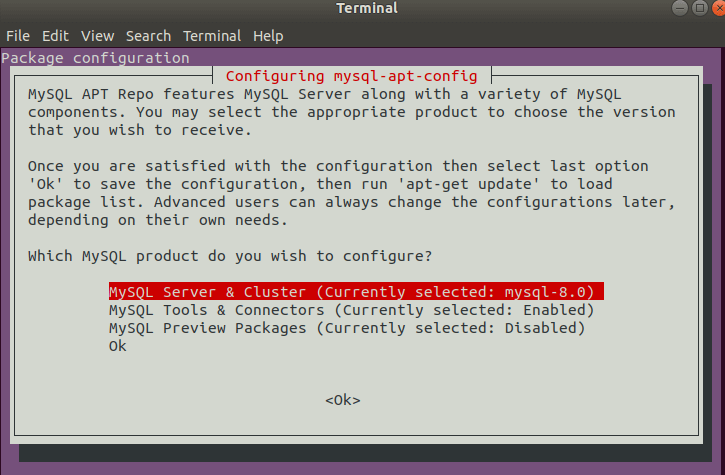
Now when you want to install MySQL server while installing the package, then select and then click on Ok.

Also Read- How to Install TeamViewer on Linux System without GUI.
Install MySQL Server:
After you have installed the MySQL repository, now use the following command for new update packages and Repositories.
itsmarttricks@mangesh:~$ sudo apt-get update
[sudo] password for itsmarttricks:
Ign:1 http://dl.google.com/linux/chrome/deb stable InRelease
Hit:2 http://dl.google.com/linux/chrome/deb stable Release
Get:4 http://security.ubuntu.com/ubuntu bionic-security InRelease [83.2 kB]
Hit:5 http://in.archive.ubuntu.com/ubuntu bionic InRelease
Get:6 http://in.archive.ubuntu.com/ubuntu bionic-updates InRelease [88.7 kB]
Get:7 http://security.ubuntu.com/ubuntu bionic-security/main amd64 DEP-11 Metadata [204 B]
Get:8 http://security.ubuntu.com/ubuntu bionic-security/universe amd64 DEP-11 Metadata [5,804 B]
Get:9 http://in.archive.ubuntu.com/ubuntu bionic-backports InRelease [74.6 kB]
Get:10 http://in.archive.ubuntu.com/ubuntu bionic-updates/main i386 Packages [262 kB]
Get:11 http://in.archive.ubuntu.com/ubuntu bionic-updates/main amd64 Packages [290 kB]
Get:12 http://in.archive.ubuntu.com/ubuntu bionic-updates/main amd64 DEP-11 Metadata [138 kB]
Get:13 http://in.archive.ubuntu.com/ubuntu bionic-updates/main DEP-11 48x48 Icons [31.4 kB]
Get:14 http://in.archive.ubuntu.com/ubuntu bionic-updates/main DEP-11 64x64 Icons [53.7 kB]
Get:15 http://in.archive.ubuntu.com/ubuntu bionic-updates/universe amd64 Packages [161 kB]
Get:16 http://in.archive.ubuntu.com/ubuntu bionic-updates/universe i386 Packages [161 kB]
Get:17 http://in.archive.ubuntu.com/ubuntu bionic-updates/universe amd64 DEP-11 Metadata [152 kB]
Get:18 http://in.archive.ubuntu.com/ubuntu bionic-updates/universe DEP-11 48x48 Icons [156 kB]
Get:19 http://in.archive.ubuntu.com/ubuntu bionic-updates/universe DEP-11 64x64 Icons [267 kB]
Get:20 http://in.archive.ubuntu.com/ubuntu bionic-updates/multiverse amd64 DEP-11 Metadata [2,464 B]
Get:21 http://in.archive.ubuntu.com/ubuntu bionic-backports/universe amd64 DEP-11 Metadata [5,100 B]
Fetched 1,931 kB in 13s (147 kB/s)
Reading package lists... Done
Now install MySQL using the following command.
itsmarttricks@mangesh:~$ sudo apt-get install apache2
Reading package lists... Done
Building dependency tree
Reading state information... Done
The following additional packages will be installed:
apache2-bin apache2-data apache2-utils libapr1 libaprutil1 libaprutil1-dbd-sqlite3 libaprutil1-ldap liblua5.2-0
Suggested packages:
apache2-doc apache2-suexec-pristine | apache2-suexec-custom
The following NEW packages will be installed:
apache2 apache2-bin apache2-data apache2-utils libapr1 libaprutil1 libaprutil1-dbd-sqlite3 libaprutil1-ldap liblua5.2-0
0 upgraded, 9 newly installed, 0 to remove and 37 not upgraded.
Need to get 1,712 kB of archives.
After this operation, 6,913 kB of additional disk space will be used.
Do you want to continue? [Y/n] y
Get:1 http://in.archive.ubuntu.com/ubuntu bionic/main amd64 libapr1 amd64 1.6.3-2 [90.9 kB]
Get:2 http://in.archive.ubuntu.com/ubuntu bionic/main amd64 libaprutil1 amd64 1.6.1-2 [84.4 kB]
When installing MySQL above ‘Do you want to continue?’ When you ask for it, press Y. Now set the password when the root user gets a window to set the password. Also, click on OK when the MySQL server authentication plugin configuration message appears. Now select the default authentication plugin and click on Ok.

Also Read- How To Install Python 3.6 on Linux Using Terminal Interface.
Secure MySQL Server Installation:
To secure the MySQL database, set a new password for that use the following command.
sudo mysql_secure_installation
After entering the above command, you will ask the following security questions:
Remove anonymous users? (Press y|Y for Yes, any other key for No) : y
Disallow root login remotely? (Press y|Y for Yes, any other key for No) : y
Remove test database and access to it? (Press y|Y for Yes, any other key for No) : y
Reload privilege tables now? (Press y|Y for Yes, any other key for No) : y
Managing MySQL Server via Systemd:
After installing the MySQL package, to see MySQL server running status, use the following command.
itsmarttricks@mangesh:~$ sudo systemctl status mysql
[sudo] password for itsmarttricks:
● mysql.service - MySQL Community Server
Loaded: loaded (/lib/systemd/system/mysql.service; enabled; vendor preset: en
Active: active (running) since Sun 2018-08-19 00:39:32 IST; 14h ago
Docs: man:mysqld(8)
http://dev.mysql.com/doc/refman/en/using-systemd.html
Main PID: 4265 (mysqld)
Status: "SERVER_OPERATING"
Tasks: 38 (limit: 2263)
CGroup: /system.slice/mysql.service
└─4265 /usr/sbin/mysqld
If you are not automatically running for some reason, use the following command to enable the system boot time first.
itsmarttricks@mangesh:~$ sudo systemctl enable mysql
[sudo] password for itsmarttricks:
Synchronizing state of mysql.service with SysV service script with /lib/systemd/systemd-sysv-install.
Executing: /lib/systemd/systemd-sysv-install enable mysql
Also Read- How to Generate SSH Keys on Windows 10 with Ubuntu
Install MySQL Products and Components:
To install MySQL Products and Components, first package update by entering sudo apt-get update command.
itsmarttricks@mangesh:~$ sudo apt-get update
[sudo] password for itsmarttricks:
Ign:1 http://dl.google.com/linux/chrome/deb stable InRelease
Hit:2 http://dl.google.com/linux/chrome/deb stable Release
Hit:3 http://security.ubuntu.com/ubuntu bionic-security InRelease
Hit:4 http://repo.mysql.com/apt/ubuntu bionic InRelease
Hit:5 http://in.archive.ubuntu.com/ubuntu bionic InRelease
Hit:7 http://in.archive.ubuntu.com/ubuntu bionic-updates InRelease
Hit:8 http://in.archive.ubuntu.com/ubuntu bionic-backports InRelease
Reading package lists... Done
Now enter the following command to install MySQL-workbench-community and libmysqlclient18 Components.
itsmarttricks@mangesh:~$ sudo apt-get install mysql-workbench-community libmysqlclient18
Reading package lists... Done
Building dependency tree
Reading state information... Done
Now enter the following command to access MySQL.
itsmarttricks@mangesh:~$ sudo mysql -u root -p
[sudo] password for itsmarttricks:
Enter password:
Welcome to the MySQL monitor. Commands end with ; or \g.
Your MySQL connection id is 11
Server version: 5.7.23-0ubuntu0.18.04.1 (Ubuntu)

Copyright (c) 2000, 2018, Oracle and/or its affiliates. All rights reserved.

Oracle is a registered trademark of Oracle Corporation and/or its
affiliates. Other names may be trademarks of their respective
owners.

Type 'help;' or '\h' for help. Type '\c' to clear the current input statement.

mysql> create database usersdb;
Query OK, 1 row affected (0.30 sec)

mysql> show databases;
+--------------------+
| Database |
+--------------------+
| information_schema |
| mysql |
| performance_schema |
| sys |
| usersdb |
+--------------------+
5 rows in set (0.18 sec)

mysql>
Also Read- How To Configure the Proxy Server On Linux Using Terminal
That’s all, In this article, we have explained How to Install MySQL in Ubuntu. I hope you enjoy this article. If you like this article, then just share it and then do subscribe to email alerts for Linux, Windows, macOS, Android, Internet, Firewall and Security, CCTV tutorials. If you have any questions or doubts about this article, please comment.