Apache Web Server is a huge application comes with some nice features like SSL Configuration, Website Authentication and so on. In this article, we are going to discuss how to configure basic authentication in Apache Web Server. The first thing that comes in my mind is what is authentication and why we need it. Let me explain to you what is authentication. Authentication is nothing but a process by which you have to give you identification to access something.
Let’s take a simple example: Suppose you want to access your Gmail account or any other mail account, for that you need to enter your Email ID and Password then only you able to access your mails. That means you shared your personal details ( Name, Address, Mobile Number..etc…) to generated that Email ID and Password with Google. Just because of the authentication process we are able to store our valuable and confidential data on web-directories safely. Today all daily basis important works are secure just because of Authentication eg: Bank Transactions.
In this article, we are going to configure basic authentication to secure the apache web directory which contains some sensitive and confidential information in the Apache web server and will give access to those users who have authorized to use that.
Steps to configure Basic Authentication with Apache Web Server:
Step: 1 Install Apache Web Server Package
Install the Apache webserver package to configure basic authentication. you can install HTTPd package either by yum repository or by rpm package.
[root@localhost ~]# yum -y install httpd   # Install Apache Webserver Package
Loaded plugins: fastestmirror, refresh-packagekit, security
Setting up Install Process
Loading mirror speeds from cached hostfile
 * base: mirror.nbrc.ac.in
 * extras: mirrors.vonline.vn
 * updates: mirrors.aluhost.com
Resolving Dependencies
--> Running transaction check
---> Package httpd.x86_64 0:2.2.15-55.el6.centos.2 will be updated
---> Package httpd.x86_64 0:2.2.15-56.el6.centos.3 will be an update
--> Processing Dependency: httpd-tools = 2.2.15-56.el6.centos.3 for package: httpd-2.2.15-56.el6.centos.3.x86_64
--> Running transaction check
---> Package httpd-tools.x86_64 0:2.2.15-55.el6.centos.2 will be updated
---> Package httpd-tools.x86_64 0:2.2.15-56.el6.centos.3 will be an update
--> Finished Dependency Resolution

Dependencies Resolved

==============================================================================================================================
 Package                      Arch                    Version                                  Repository                Size
==============================================================================================================================
Updating:
 httpd                        x86_64                  2.2.15-56.el6.centos.3                   updates                  834 k
Updating for dependencies:
 httpd-tools                  x86_64                  2.2.15-56.el6.centos.3                   updates                   79 k

Transaction Summary
==============================================================================================================================
Upgrade       2 Package(s)

Total download size: 913 k
Downloading Packages:
(1/2): httpd-2.2.15-56.el6.centos.3.x86_64.rpm                                                         | 834 kB     00:13
(2/2): httpd-tools-2.2.15-56.el6.centos.3.x86_64.rpm                                                   |  79 kB     00:00
------------------------------------------------------------------------------------------------------------------------------
Total                                                                                          56 kB/s | 913 kB     00:16
Running rpm_check_debug
Running Transaction Test
Transaction Test Succeeded
Running Transaction
  Updating   : httpd-tools-2.2.15-56.el6.centos.3.x86_64                                                                  1/4
  Updating   : httpd-2.2.15-56.el6.centos.3.x86_64                                                                        2/4
  Cleanup    : httpd-2.2.15-55.el6.centos.2.x86_64                                                                        3/4
  Cleanup    : httpd-tools-2.2.15-55.el6.centos.2.x86_64                                                                  4/4
  Verifying  : httpd-2.2.15-56.el6.centos.3.x86_64                                                                        1/4
  Verifying  : httpd-tools-2.2.15-56.el6.centos.3.x86_64                                                                  2/4
  Verifying  : httpd-tools-2.2.15-55.el6.centos.2.x86_64                                                                  3/4
  Verifying  : httpd-2.2.15-55.el6.centos.2.x86_64                                                                        4/4

Updated:
  httpd.x86_64 0:2.2.15-56.el6.centos.3

Dependency Updated:
  httpd-tools.x86_64 0:2.2.15-56.el6.centos.3

Complete!
Apache webserver package installed successfully, now start the httpd service by below command.
[root@localhost ~]# /etc/init.d/httpd start   # Start the Apache Webserver Service
Starting httpd: httpd: Could not reliably determine the server's fully qualified domain name, using localhost.localdomain for ServerName
                                                           [  OK  ]
Now open your web browser and enter http://localhost to confirm if the apache web server is working fine or not. Follow the snapshot below.

As we can see on the snapshot above the apache web server default page opens without any authentication. Here is an example I am taking apache web server default page as my website and I will show you how to configure authentication for this so that it will ask for username & password when we open it.
Step: 2 Create Password File for Apache Basic Authentication
For basic authentication with the apache web server you we need a username and password. Here we have a tool that comes with apache package installation i.e. htpasswd. So let’s create a username and password by using htpasswd command. Follow the command below.
After executing the command it will ask to enter a password, So enter the password twice to confirm.
Note: This username and password are going to use to access a website.
[root@localhost ~]# htpasswd -c /etc/httpd/.htpasswd itsmarttricks # Create Password File for Authentication
New password:
Re-type new password:
Adding password for user itsmarttricks
Where :
.htpasswd is the password file that contains username and password for Apache basic authentication which is located at /etc/httpd directory.
itsmarttricks is the username.
You can confirm the availability of users in /etc/httpd/.htpasswd file by below command.
[root@localhost ~]# cat /etc/httpd/.htpasswd    # Check the Password file
itsmarttricks:QmQxg1A7TcQlw
Step : 3 Create a Virtual Host in Apache Web Server
To create a VirtualHost in Apache webserver just edit the main configuration file i.e. /etc/httpd/conf/httpd.conf and go to the end of the file and add the below lines.
Note: Here is my practice lab I am taking Apache Web Server default page as my website, So let’s configure basic authentication for that so that it will ask for username and password when opening it.
To configure authentication just add the below lines to your VirtualHost just before the </VirtualHost> syntax :
<Directory “/var/www/html”>
AuthType Basic
AuthName “Authentication Required”
AuthUserFile /etc/httpd/.htpasswd
Require valid-user
</Directory>
Refer the configuration below. (Configuration part are highlighted in Blue Color)
# Add VirtualHost in Apache main configuration file with Directory Rescriction

### Apache Authentication ###
<VirtualHost *:80>
ServerAdmin webmaster@itsmarttricks.com
    DocumentRoot /var/www/html
    ServerName itsmarttricks.com
    ErrorLog logs/www.google.com-error_log
    CustomLog logs/itsmarttricks.com-access_log common
        <Directory "/var/www/html">
        AuthType Basic
        AuthName "Authentication Required"
        AuthUserFile /etc/httpd/.htpasswd
        Require valid-user
        </Directory>
</VirtualHost>
### Apache Authentication ###
Where :
- <VirtualHost> & </VirtualHost> – Syntax for Start & Close of VirtualHost.
- ServerAdmin – To mention the Email of the Webmaster.
- DocumentRoot – Document(Files & Directories) location of your Website.
- ServerName – Domain Name of your Website eg: itsmarttricks.com
- ErrorLog – To mention the log file location for your Apache Web Server errors.
- CustomLog – To mention log file location for apache access logs.
- <Directory> & </Directory> – To add some additional features for your VirtualHost for eg: Here we are adding basic authentication for our VirtualHost.
- AuthType – To mention Authentication Type eg: Here we are using Basic Authentication.
- AuthName – To mention the message which will show on your authentication page.
- AuthUserFile – To mention the File Path which is containing Username & Password details eg: Here it is /etc/httpd/.htpasswd
- Require – valid-user – So that it will take only that user which is available in .htpasswd file.
Now restart the Apache Service to take effect the changes.
[root@localhost ~]# /etc/init.d/httpd restart # Restart the Apache Webserver Service
Stopping httpd: [ OK ]
Starting httpd: httpd: Could not reliably determine the server's fully qualified domain name, using localhost.localdomain for ServerName
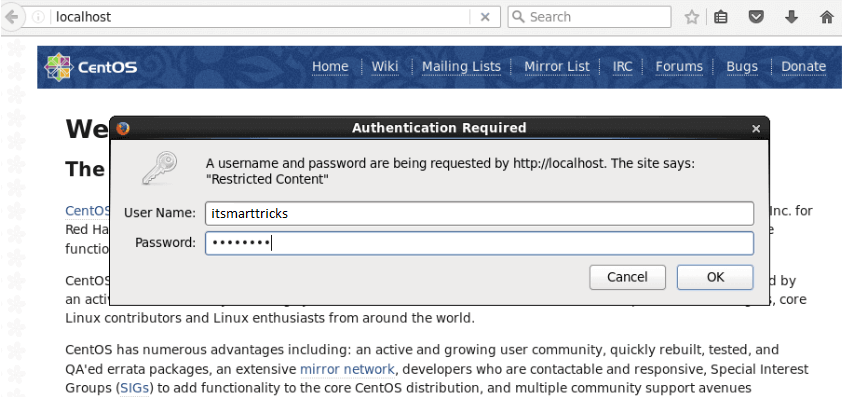
[ OK ]We are done with all the required changes, Now its time for testing. So Let’s access the Apache Web Server default page and I am sure it will ask for a username & Password.

As we can see above now Apache Web Server asking for Username & Password when we are trying to access Default Web Page. Here enter the Username and Password which we have to create using htpasswd command on Step 2 above.
That’s all, In this article, we have explained How to Configure Basic Authentication in Apache Web Server. I hope you enjoy this article. If you like this article, then just share it. If you have any questions about this article, please comment