
In Microsoft Outlook, the signature is used by you to add a signature when you send each mail. Now we are going to draw a permanent solution to it. In this article, let’s see Automatically Add And Create Signature In Microsoft Outlook 2016. Now let’s understand what is the email signature. At the end of every email we write something like :
Mangesh Dhulap
E-Mail: admin@itsmarttricks.com
Contact : 00000000
In signature, you can include Greeting with Your Name, Email Address, Contact details, Social Links, and so on. It is very difficult to type all the above details every time we write an email. Microsoft Outlook allows us to create an email signature which helps to insert our drafted email signature automatically while creating a new email and also during Reply/Forward emails. Here I will show you how to do that. So let’s get started.
Follow the below steps to Automatically Add And Create Signature In Microsoft Outlook 2016:
File Tab:
Now we are going to add the signature to Outlook, open Outlook for the first time. After opening the default, go to ‘File Tab’.
Options Menu:
Now select the Options menu in the Mail category. Clicking the Options menu will open an outlook options window.
Mail-Signatures:
Here, like the following snap, go to the ‘mail‘ menu of the Outlook window and click on the Signatures option and open it.
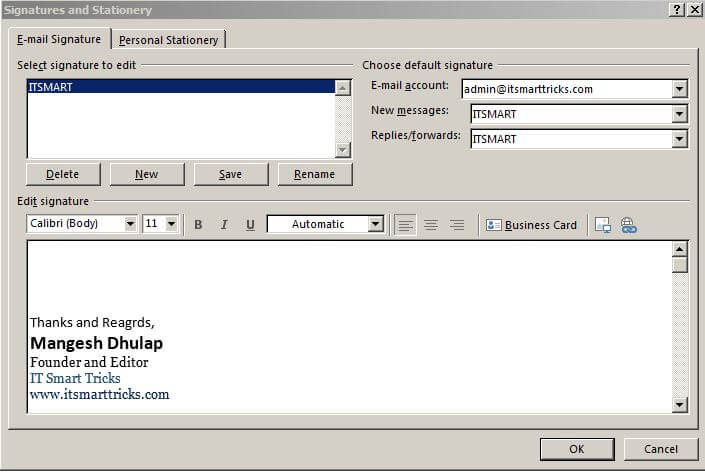
Signature and Stationery:
Now we want to create a new signature so click on ‘new‘. Type the name of the user whose signature is to be used here.
Create a signature:
Now the time has come to create a signature. In the first ‘edit signature’ option, you can create a signature by entering your name and other company information. If you have used font and color in signature then you can use it. Most likely you use the signature for new mail, but if you want to use it in reply and forward, add Signature in the ‘Reply/forward‘ option.

Also Read- How to configure Microsoft Outlook 2016 Step By Steps.
That’s all, In this article, we have explained Automatically Add And Create Signature In Microsoft Outlook 2016. I hope you enjoy this article. If you like this article, then just share it. If you have any questions about this article, please comment.