
In this article, we are going to learn How to Change Computer Name Or Hostname in Microsoft Windows. The computer name is the identity of any computer. When we connect the computer in the network it’s mandatory to assign a valid computer name to make it easy to identify each and every computer by its name from the Server end. This will also help you to maintain an inventory of your computer assets.
Large organizations have a specific policy to create Computer Name. For example, if an organization is spread over different states or different countries then you can create a computer name such a way that it should include Your Country Name, State Name, Location Name…etc…This will helps to identify computer location by just look at its computer name. Hence Computer Name is one of the major parts to identify and manage the computer. It’s very simple to change the computer name in Microsoft Windows. In this article, I will show you How to that. You have to follow the simple 5 steps to do the same. So let’s get started.
Follow the below steps to Change Computer Name Or Hostname in Microsoft Windows:
Found the Computer icon on the desktop. Right-click on Computer then click on Properties. After the above step, you will get the below window in front of you. Here just click on Change Settings, Or enter ‘sysdm.cpl‘ the command to open system Properties.

Now System Properties windows will open in front of you. Here click on the Change button to change the Computer Name.

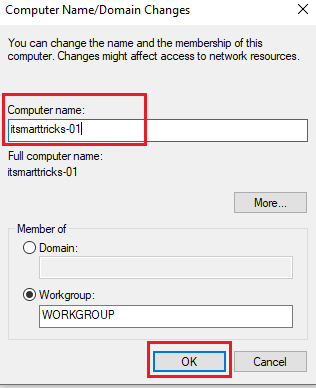
Just enter the required computer name on the Computer Name field then click on Ok. The system will ask you to restart your system to take effect. so just click on Ok.

Now we have to restart the system to effect the changes. So just click on Restart Now button.

As you can see above we have successfully changed the Computer Name. To confirm the same enter the ‘sysdm.cpl‘ command and check Computer Name or hostname.

Also Read – How to Add Hostname in Active Directory and Add Client System in Domain
That’s all, In this article, we have explained the How to Change Computer Name Or Hostname in Microsoft Windows. I hope you enjoy this article. If you like this article, then just share it. If you have any questions about this article, please comment.