
Today in this article we are going to discuss How to install Ubuntu 17.04 Operating System step by step with screenshots. Before that let’s know something about Ubuntu. The Ubuntu 17.04 version was released on April 13, 2017. It has the New Kernel version 4.10, as well as LibreOffice 5.3.
System Requirements for Install Ubuntu 17.04:
- Processor: Dual Core 2 GHz.
- Ram/Memory : 2 GB
- Hard-Drive Space: 25 GB
- Screen Resolution VGA: 1024 x 768.
- Installer Media: CD/DVD or USB Flash Drive Bootable
Follow the below steps to Install Ubuntu 17.04:
To Install Ubuntu 17.04 first, ‘Ubuntu iso-image’ is required, if you are installing Ubuntu 17.04 Desktop USB pen drive, then it should be bootable. If you are installing to a VMware or virtual box, you do not need to create bootable media.
After downloading the iso image, start the installation according to the following process by booting the system. Just click on Install Ubuntu 17.04 and start the installation process.

If you want Ubuntu updates and ThirdParty software, then tick here otherwise click on untick and then click on continue.

You are going to Install Ubuntu 17.04 by creating a partition of your hard drive and I will choose ‘something else‘ option and click on continue.

Here, select the disk as a partition of Hard Disk for Install Ubuntu 17.04 and click on “New Partition Table“.
New Partition Scheme:
1) /boot Partition - 469 MB. (ext4 files system)

2) Swap Partition - 2001 MB.

3) / Partition - 25000 MB.(ext4 files system)

Just click on Continue.

According to the snapshots given below, create a ‘/boot partition’ for Linux Ubuntu by double-clicking on free space on the hard disk. For this partition, we will take 469 sizes here. Also, select ‘primary partition‘ and ‘beginning of this space‘ and select ‘/boot‘ in the mount point and click OK.

After creating a boot partition, double-click on the free space in the disc and make the swap partition as per the snapshot below. In this, we take the size 2001. Also, select ‘primary partition’ and ‘beginning of this space‘ and select ‘swap area‘ in the use as and click OK.

After creating the swap partition, double-click on the free space in the disc remaining and create the ‘/ partition‘ partition according to the snapshot below. In this, we can take the size 25000. Also, select ‘primary partition‘ and ‘beginning of this space‘ and select ‘/’ in the mount point and click OK.

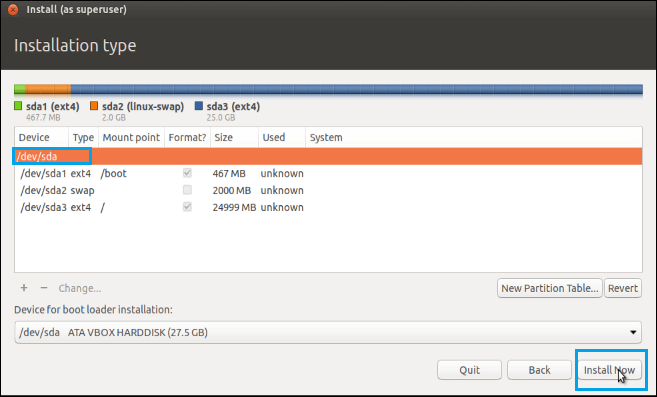
All necessary partitions have been created for the Linux Ubuntu desktop. Now click on install now.

Click on Install Now, when a pop window appears, check the partition that you created in it and click on continue.

Select Timezone according to your location here for Ubuntu desktop.

Select the language that you want, or select the Default Keyboard Layout and click on Continue.

Now let’s set up a user account on your Ubuntu desktop. In this, set your name, computer name, a system username, and strong password, then click on “Continue“.

Now the installation files will be copied.

Also Read- Top 10 Best Free Ubuntu Themes User Needs To Know.
Restart the system after the Ubuntu installation is completed.

Enter the user’s password here and log in to the desktop.

In this way, you have just successfully Install Ubuntu 17.04 Desktop

That’s all, In this article, we have explained the Step By Step Installation Of Ubuntu 17.04 With Screenshots. I hope you enjoy this article. If you like this article, then just share it. If you have any questions about this article, please comment.