In this article we are going to discuss How to Configure SSL Certificate in Apache Web Server. SSL Stands for Secure Sockets Layer used for Websites to transfer data over internet or over network Securely. In today’s world Internet is became mandatory to perform any task such as Bank Transactions, Shopping, All kind Bill Payments and So on. To do all this task we need to Enter our Confidential Information like Credit/Debit Card Numbers, Bank Account Number, Username, Password and So on.
Because of SSL Certificate our Confidential Data able to transfer over internet in Encrypted Format So that no one can Hack and Understand and steal our data, Without SSL the data over internet will travel in a plain text format and any one can hack our data and can misuse it.

So Let’s have a look at the steps of SSL Configuration in Apache Web Server.
Follow the below Step to Configure SSL Certificate in Apache Web Server:
Preparation Before Apache SSL Configuration:
Before SSL Configuration for Apache VirtualHost, we need to Install and Configure Apache Web Server and add a VirtualHost as an Example purpose. So Follow the below steps to do the same.
Install Apache Package by below command :
# yum -y install httpd
Loaded plugins: fastestmirror
Loading mirror speeds from cached hostfile
 * addons: mirror.fibergrid.in
 * base: mirror.fibergrid.in
 * extras: mirror.fibergrid.in
 * updates: mirror.fibergrid.in
Setting up Install Process
Resolving Dependencies
--> Running transaction check
---> Package httpd.i386 0:2.2.3-92.el5.centos set to be updated
addons/filelists_db                                      |  574 B     00:00
base/filelists                                           | 3.1 MB     00:26
extras/filelists_db                                      | 212 kB     00:01
updates/filelists_db                                     | 5.0 MB     00:43
--> Finished Dependency Resolution

Dependencies Resolved

================================================================================
 Package       Arch         Version                       Repository       Size
================================================================================
Installing:
 httpd         i386         2.2.3-92.el5.centos           updates         1.2 M

Transaction Summary
================================================================================
Install       1 Package(s)
Upgrade       0 Package(s)

Total download size: 1.2 M
Downloading Packages:
httpd-2.2.3-92.el5.centos.i386.rpm                       | 1.2 MB     00:10
warning: rpmts_HdrFromFdno: Header V3 DSA signature: NOKEY, key ID e8562897
updates/gpgkey                                           | 1.5 kB     00:00
Importing GPG key 0xE8562897 "CentOS-5 Key (CentOS 5 Official Signing Key) " from /etc/pki/rpm-gpg/RPM-GPG-KEY-CentOS-5
Running rpm_check_debug
Running Transaction Test
Finished Transaction Test
Transaction Test Succeeded
Running Transaction
  Installing     : httpd                                                    1/1

Installed:
  httpd.i386 0:2.2.3-92.el5.centos

Complete!
[root@localhost ~]#
We can use the below command to check if httpd is installed or not
# rpm -qa | grep httpd
httpd-2.2.3-92.el5.centos
Now we need to add a VirtualHost So follow the below steps to do the same.
Before any changes in Apache main Configuration file (httpd.conf) take a backup by below command.
# cd /etc/httpd/conf
# cp httpd.conf httpd.conf.backup
# ls
httpd.conf  httpd.conf.backup  magic
Now edit the httpd.conf file and go to the end of the configuration file, follow the below steps
# nano /etc/httpd/conf/httpd.conf
Now add the below lines to add a VirtualHost

192.168.0.107 is the IP Address if the Apache Web Server and Port 80 is the Default for WWE.
As we can see above on VirtualHost we have mentioned DocumentRoot Path i.e. /var/www/html/itsmarttricks.com, So we need to create a Directory itsmarttricks.com and copy our Website Document’s on this path.
For now, we can create a sample index.html file as a Website Document and put some text like Welcome to itsmarttricks (As per my Scenario) by edit it, so follow the below steps :
# mkdir /var/www/html/itsmarttricks.com
# nano /var/www/html/itsmarttricks.com/index.html
# ls -l /var/www/html/itsmarttricks.com/
total 4
-rw-r--r-- 1 root root 22 Dec 11 20:21 index.html

Now check the httpd.conf if everything is perfectly configured by the below command.
# httpd -t
Syntax OK
As we can see above everything looks good, So let’s start the apache server and also start it on Startup by the below command.
# /etc/init.d/httpd start
Starting httpd:                                            [  OK  ]
# chkconfig --level 35 httpd on
# chkconfig --list httpd
   httpd           0:off   1:off   2:off   3:on    4:off   5:on    6:off
Now test it by entering http://localhost in Browser.

OR If you want to access by a domain name as mentioned in VirtualHost i.e. itsmarttricks.com, you have to Configure BIND DNS Server OR just enter in /etc/hosts file as shown below.
Just edit the /etc/hosts file using the command nano /etc/hosts and enter the line as highlighted below on the snapshot.

As we can see above now our site is opening as http://localhost means now it’s not configured with SSL, Let’s configure this VirtualHost to work over https, So Follow the below steps.
Step : 1 Install Required Packages
We need to install two Packages to Configure SSL for Apache VirtualHost i.e.
1. openssl
2. mod_ssl
So Let’s Install the required packages by the below command.
# yum -y install openssl mod_ssl
Loaded plugins: fastestmirror
Loading mirror speeds from cached hostfile
 * addons: mirror.fibergrid.in
 * base: mirror.fibergrid.in
 * extras: mirror.fibergrid.in
 * updates: mirror.fibergrid.in
Setting up Install Process
Resolving Dependencies
--> Running transaction check
---> Package mod_ssl.i386 1:2.2.3-92.el5.centos set to be updated
--> Processing Dependency: libdistcache.so.1 for package: mod_ssl
--> Processing Dependency: libnal.so.1 for package: mod_ssl
---> Package openssl.i686 0:0.9.8e-40.el5_11 set to be updated
--> Running transaction check
---> Package distcache.i386 0:1.4.5-14.1 set to be updated
--> Finished Dependency Resolution

Dependencies Resolved

================================================================================================================
 Package                  Arch                Version                              Repository              Size
================================================================================================================
Installing:
 mod_ssl                  i386                1:2.2.3-92.el5.centos                updates                 98 k
Updating:
 openssl                  i686                0.9.8e-40.el5_11                     updates                1.7 M
Installing for dependencies:
 distcache                i386                1.4.5-14.1                           base                   119 k

Transaction Summary
================================================================================================================
Install       2 Package(s)
Upgrade       1 Package(s)

Total download size: 1.9 M
Downloading Packages:
(1/3): mod_ssl-2.2.3-92.el5.centos.i386.rpm                                              |  98 kB     00:03
(2/3): distcache-1.4.5-14.1.i386.rpm                                                     | 119 kB     00:01
(3/3): openssl-0.9.8e-40.el5_11.i686.rpm                                                 | 1.7 MB     00:14
----------------------------------------------------------------------------------------------------------------
Total                                                                            58 kB/s | 1.9 MB     00:33
Running rpm_check_debug
Running Transaction Test
Finished Transaction Test
Transaction Test Succeeded
Running Transaction
  Updating       : openssl                                                                                  1/4
  Installing     : distcache                                                                                2/4
  Installing     : mod_ssl                                                                                  3/4
  Cleanup        : openssl                                                                                  4/4

Installed:
  mod_ssl.i386 1:2.2.3-92.el5.centos

Dependency Installed:
  distcache.i386 0:1.4.5-14.1

Updated:
  openssl.i686 0:0.9.8e-40.el5_11

Complete!
[root@localhost ~]#
Step : 2 Generate Self-Signed Certificate
Now Let’ go ahead and Generate a Self-Signed Certificate for our VirtualHost to be work as SSL, So Follow the below steps :
1. Generate Private Key using below Command :
# openssl genrsa -out itsmarttricks.key 2048
Generating RSA private key, 2048 bit long modulus
............+++
.........................................+++
e is 65537 (0x10001)
2. Generate CSR i.e. Certificate Signing Request :
# openssl req -new -key itsmarttricks.key -out itsmarttricks.csr
You are about to be asked to enter information that will be incorporated
into your certificate request.
What you are about to enter is what is called a Distinguished Name or a DN.
There are quite a few fields but you can leave some blank
For some fields there will be a default value,
If you enter '.', the field will be left blank.
-----
Country Name (2 letter code) [GB]:IN
State or Province Name (full name) [Berkshire]:Maharashtra
Locality Name (eg, city) [Newbury]:Mumbai
Organization Name (eg, company) [My Company Ltd]:itsmarttricks
Organizational Unit Name (eg, section) []:Linux Education
Common Name (eg, your name or your server's hostname) []:itsmarttricks.com
Email Address []:admin@itsmarttricks.com

Please enter the following 'extra' attributes
to be sent with your certificate request
A challenge password []:
An optional company name []:
[root@localhost ~]#
3. Generate Self-Signed Certificate :
# openssl x509 -req -days 1095 -in itsmarttricks.csr -signkey itsmarttricks.key -out itsmarttricks.crt
Signature ok
subject=/C=IN/ST=Maharashtra/L=Mumbai/O=itsmarttricks/OU=Linux Education/CN=itsmarttricks.com/emailAddress=admin@itsmarttricks.com
Getting Private key
So we Generated all required Certificates as shown below.
# ls
   anaconda-ks.cfg  Desktop  itsmarttricks.crt  itsmarttricks.csr  itsmarttricks.key  install.log  install.log.syslog
Step : 3 Copy Certificates to Necessary Location
Now we have to copy all created Certificates to necessary location.
Copy the itsmarttricks.crt to /etc/pki/tls/cert
# cp itsmarttricks.crt /etc/pki/tls/certs/
# ls /etc/pki/tls/certs/
ca-bundle.crt  itsmarttricks.crt  localhost.crt  make-dummy-cert  Makefile
Copy the itsmarttricks.key to /etc/pki/tls/private
# cp itsmarttricks.key /etc/pki/tls/private/
# ls
anaconda-ks.cfg  Desktop  itsmarttricks.crt  itsmarttricks.csr  itsmarttricks.key  install.log  install.log.syslog
Copy the itsmarttricks.csr to /etc/pki/tls/private
# cp itsmarttricks.csr /etc/pki/tls/private/
# ls /etc/pki/tls/private/
itsmarttricks.csr  itsmarttricks.key  localhost.key
Step : 4 Configure ssl.conf
As we can see above we copied all Certificates to the required directories, now let’s configure the ssl.conf file as shown below.
Edit the /etc/httpd/conf.d/ssl.conf file as shown below
# nano /etc/httpd/conf.d/ssl.conf
now search for SSLCertificateFile and then mention the path of SSL Certificate file in front of that which we created above i.e. itsmarttricks.crt
After mentioning the path the line should look like as mentioned below :
SSLCertificateFile /etc/pki/tls/certs/itsmarttricks.crt
now search for SSLCertificateKeyFile and then mention the path of SSL Certificate Key file infront of that which we created above i.e. itsmarttricks.key
After mentioning the path the line should look like as mentioned below :
SSLCertificateKeyFile /etc/pki/tls/private/itsmarttricks.key

As shown on the snapshot above required changes in ssl.conf configuration file highlighted by blue color.
Step: 5 SSL Configuration for VirtualHost
Now we have to make changes in our VirtualHost as shown below :
Before we have added VirtualHost for Port 80 on this tutorial above, now we need to make changes in that configuration To Work for https, So Follow the below steps.
VirtualHost Configured for Port 80 as shown below :

We need to do changes on the above configuration for https is :
Replace the Port 80 with 443 as the Port Number of SSL is 443 and then place below-mentioned lines after <VirtualHost 192.168.0.107:443>
# To Enable the SSL Support for this VirtualHost
SSLEngine on
# Path of SSL Certificate File
SSLCertificateFile /etc/pki/tls/certs/itsmarttricks.crt
# Path of SSL Certificate Key File
SSLCertificateKeyFile /etc/pki/tls/private/itsmarttricks.key
After Complete changes the VirtualHost should look like as shown on the snapshot below, and all changes are hilighted by blue color.

Now restart the Apache Service by the below command.
# /etc/init.d/httpd restart
Stopping httpd:                                            [  OK  ]
Starting httpd:                                            [  OK  ]
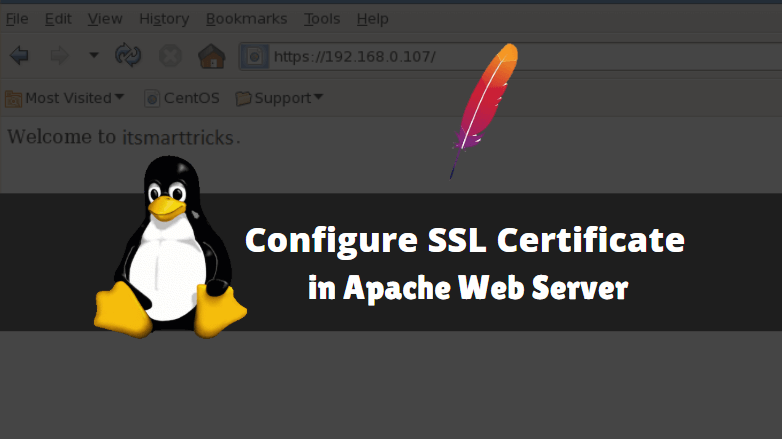
So We have completed our configuration part, Now it’s time for Testing So Just open the Web Browser and Enter https://<IP_Address_Of_The_Apache_Web_Server>, In our Case It’s https://192.168.0.107 as shown in the snapshot below.

Note: In Firefox Web Browser you may found Exception Error, So just Click on add Exception and Accept the Certificate manually. Then you can access https Site on Firefox. Follow the same step for Google Chrome also.
Also Read – How to Configure Basic Authentication in Apache Web Server
That’s all, In this article, we have explained How to Configure SSL Certificate in Apache Web Server. I hope you enjoy this article. If you like this article, then just share it. If you have any questions about this article, please comment.