Nextcloud is a suite of client-server software for creating and using file hosting services. Nextcloud is the most popular cloud solutions software. It is functionally similar to Dropbox, although Nextcloud is free and open-source, allowing anyone to install and operate it on a private server. Nextcloud is the easiest to use, as well as powerful and flexible cloud solutions. Frank Karlitschek forked are an ownCloud and Nextcloud developer. Nextcloud has been preferred for the users of mobile devices and desktops. Nextcloud You can install Windows(Windows XP, Vista, 7 and 8) and MacOS(10.6 or later) operating systems along with Linux-distributions. Nextcloud Client users can manage calendars, contacts, scheduled tasks and streaming media from within the platform. Nextcloud gives OpenID or LDAP through permits to the user for administration. Content can be shared by permit read/write. We will now see How to install Nextcloud Client on Ubuntu.
Follow the below Steps to Install Nextcloud Client on Ubuntu:
Now let us run a few commands in this terminal. Open the terminal and enter the following command ‘apt‘ and update the repository.
itsmarttricks@mangesh:~$ sudo add-apt-repository ppa:nextcloud-devs/client
[sudo] password for itsmarttricks:
The Nextcloud desktop client compiled for Ubuntu
More info: https://launchpad.net/~nextcloud-devs/+archive/ubuntu/client
Press [ENTER] to continue or Ctrl-c to cancel adding it.

Ign:1 http://dl.google.com/linux/chrome/deb stable InRelease
Get:2 http://ppa.launchpad.net/nextcloud-devs/client/ubuntu bionic InRelease [15.9 kB]
Hit:3 http://dl.google.com/linux/chrome/deb stable Release
Get:4 http://security.ubuntu.com/ubuntu bionic-security InRelease [83.2 kB]
Hit:5 http://in.archive.ubuntu.com/ubuntu bionic InRelease
Get:7 http://in.archive.ubuntu.com/ubuntu bionic-updates InRelease [88.7 kB]
Hit:8 https://dl.winehq.org/wine-builds/ubuntu bionic InRelease
Get:9 http://ppa.launchpad.net/nextcloud-devs/client/ubuntu bionic/main amd64 Packages [1,760 B]
Get:10 http://ppa.launchpad.net/nextcloud-devs/client/ubuntu bionic/main i386 Packages [1,760 B]
Get:11 http://ppa.launchpad.net/nextcloud-devs/client/ubuntu bionic/main Translation-en [712 B]
Hit:12 http://in.archive.ubuntu.com/ubuntu bionic-backports InRelease
Fetched 192 kB in 31s (6,151 B/s)
Reading package lists... Done
Run the command ‘sudo apt update‘ when the above commands are run.
itsmarttricks@mangesh:~$ sudo apt update
[sudo] password for itsmarttricks:
Ign:1 http://dl.google.com/linux/chrome/deb stable InRelease
Hit:2 http://ppa.launchpad.net/nextcloud-devs/client/ubuntu bionic InRelease
Hit:3 http://in.archive.ubuntu.com/ubuntu bionic InRelease
Hit:4 http://dl.google.com/linux/chrome/deb stable Release
Get:5 http://security.ubuntu.com/ubuntu bionic-security InRelease [83.2 kB]
Hit:7 https://dl.winehq.org/wine-builds/ubuntu bionic InRelease
Get:8 http://in.archive.ubuntu.com/ubuntu bionic-updates InRelease [88.7 kB]
Hit:9 http://in.archive.ubuntu.com/ubuntu bionic-backports InRelease
Get:10 http://in.archive.ubuntu.com/ubuntu bionic-updates/main i386 Packages [273 kB]
Get:11 http://in.archive.ubuntu.com/ubuntu bionic-updates/main amd64 Packages [305 kB]
Get:12 http://in.archive.ubuntu.com/ubuntu bionic-updates/universe amd64 Packages [172 kB]
Get:13 http://in.archive.ubuntu.com/ubuntu bionic-updates/universe i386 Packages [173 kB]
Fetched 1,095 kB in 6s (176 kB/s)
Reading package lists... Done
Building dependency tree
Reading state information... Done
9 packages can be upgraded. Run 'apt list --upgradable' to see them.
Also Read – How to Install MySQL 8.0 in Ubuntu
Now enter the following command to install ‘nextcloud-client‘.
itsmarttricks@mangesh:~$ sudo apt install nextcloud-client
Reading package lists... Done
Building dependency tree
Reading state information... Done
The following packages were automatically installed and are no longer required:
gconf-service gconf-service-backend gconf2-common libde265-0 libgconf-2-4
libnvidia-decode-390 libnvidia-decode-390:i386 libnvidia-encode-390
libwoff1 nextcloud-client-l10n
Suggested packages:
qt5-qmltooling-plugins
The following NEW packages will be installed:
libbrotli1 libgnome-keyring-common libgnome-keyring0 libnextcloudsync0
Need to get 1,523 kB/17.1 MB of archives.
After this operation, 68.7 MB of additional disk space will be used.
Do you want to continue? [Y/n] y
Get:1 http://ppa.launchpad.net/nextcloud-devs/client/ubuntu bionic/main amd64 libnextcloudsync0 amd64 2.3.3-20180415.190957~bionic1 [427 kB]
Get:2 http://ppa.launchpad.net/nextcloud-devs/client/ubuntu bionic/main amd64 nextcloud-client amd64 2.3.3-20180415.190957~bionic1 [1,096 kB]
Fetched 1,316 kB in 4s (351 kB/s)
Selecting previously unselected package libgnome-keyring-common.
Unpacking libgnome-keyring-common (3.12.0-1build1) ...
Processing triggers for libc-bin (2.27-3ubuntu1) ...
Also Read – How to Install LAMP Stack with PhpMyAdmin in Ubuntu
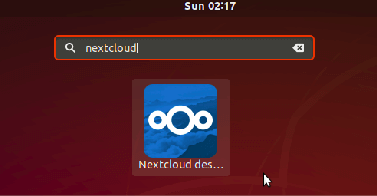
Now you can see ‘nextcloud client’ successfully installed. Search for ‘nextcloud‘ in the application and open it.
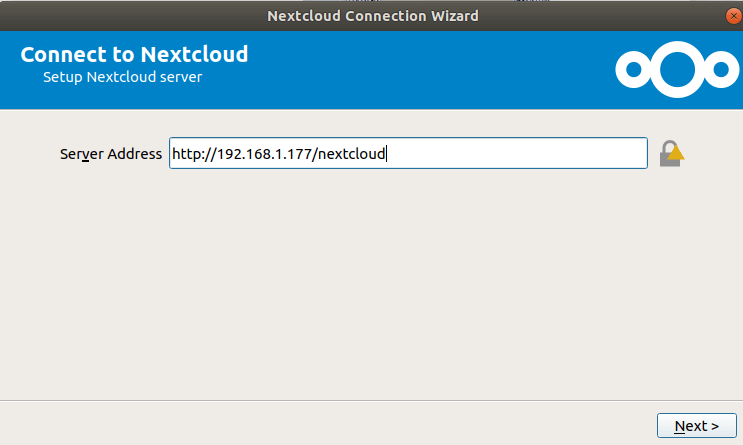
Use the Nextcloud server to connect.
Also Read – How to Install and Configure Thunderbird 52.9.1 in Ubuntu
That’s all, In this article, we have explained How to Install Nextcloud Client on Ubuntu Linux. If you like this article, then just share it and then do subscribe to email alerts for Linux, Windows, macOS, Android, Internet, Firewall and Security, CCTV tutorials. If you have any questions or doubts about this article, please comment.