In this article, we are going to learn How to setup a Master/Primary DNS Server with Bind in Redhat/Centos/Fedora. Master DNS Server is Also Referred to as a Primary DNS Server. BIND Stands for ( Berkely Internet Name Domain ) and DNS Server Stands for ( Domain Name System/Server ) is a Service/Protocol used for Resolving the Name to IP Address and IP Address to Name. Master/Primary DNS Server is the main DNS Server where all Name Resolve Databases and Users’ queries are stored and Other DNS Servers ( Secondary DNS Server & Caching DNS Server ) take a query from Master DNS Server.
Let’s take an example: We have millions of websites all over the world and all websites are associated with an IP Address and a Domain name. When we are trying to open a website eg: https://www.itsmarttricks.com, At the back end DNS finds the IP address associated with that Domain Name and resolves it, and makes available the website in-front of us. We are able to simply remind so many websites just because of DNS, Without DNS we would have to remind all websites by IP Address instead of Name which is almost impossible for us.

Types of DNS Server’s are :
- Caching Only Name Server
Caching Only Name Server is a name server which is stores the DNS Query Information in its own cache for later use.
- Master/Primary DNS Server
Master/Primary DNS Server is the main DNS server where all the database i.e. Zone Files stores and It transfers zone data to other DNS Servers i.e. Slave DNS Servers.
- Secondary/Slave DNS Server
Slave DNS Server is like a Load Balancer of Master/Primary DNS Server which is received zone data from Master DNS Server.
Prepare before Master/Primary DNS Server Configuration :
My Scenario :
- IP Address: 192.168.1.100
- Domain Name: itsmarttricks.com
- Hostname: ns1
- FQDN ( Fully Qualified Domain Name ) : ns1.itsmarttricks.com
Configure the Network Card:
First, we need to configure the network card and assign IP Address, Subnet Mask to our System.
So edit the Network card ( In my case it’s eth0 ), using nano editor as shown below
[root@localhost ~]# nano /etc/sysconfig/network-scripts/ifcfg-eth0
Now enter the below details as shown below ( Highlighted in Blue Color )
   # Advanced Micro Devices [AMD] 79c970 [PCnet32 LANCE]
   DEVICE=eth0
   BOOTPROTO=NONE    # Replace dhcp with NONE
   IPADDR=192.168.1.100   # IP Address of the BIND Server
   NETMASK=255.255.255.0  # Subnet Mask
   GATEWAY=192.168.1.1    # Gateway
   DOMAIN="itsmarttricks.com"
   DNS1=127.0.0.1   # Preferred DNS IP Address ( We can Mention the IP Address of the BIND Server OR LOcalhost i.e. 127.0.0.1 )
   HWADDR=00:0C:29:5B:83:74
   ONBOOT=yes
Change the Computer Name
Follow the below step to Change the Computer Name. ( Make Changes as shown below Highlighted in Blue Color).
[root@localhost ~]# nano /etc/sysconfig/network
   NETWORKING=yes
   NETWORKING_IPV6=no
   HOSTNAME=ns1.itsmarttricks.com    # Hostname of the BIND Server
Configure the DNS Client (/etc/resolv.conf)
After update the /etc/sysconfig/network-scripts/ifcfg-eth0 file the /etc/resolv.conf file would look like this as shown below.
   [root@localhost ~]# cat /etc/resolv.conf

   nameserver 127.0.0.1
   search itsmarttricks.com
   [root@localhost ~]#
Configure the hosts File ( /etc/hosts )
Update the host file as shown below (Highlighted in Blue Color)
   [root@localhost ~]# nano /etc/hosts

   # Do not remove the following line, or various programs
   # that require network functionality will fail.
   127.0.0.1               localhost.localdomain localhost
   ::1             localhost6.localdomain6 localhost6

   192.168.1.100   ns1     ns1.itsmarttricks.com
Also Read – How to Configure Slave DNS Server With Bind ( Secondary Dns Server ) In Linux
Follow the below Steps to Configure Primary DNS Server:
Step: 1 Package Required
We need to install Required Packages for Master/Primary DNS Server i.e. :
- bind
- bind-utils
- bind-libs
Follow the below command to install bind, bind-utils, and bind-libs Package.
   [root@localhost ~]# yum -y install bind
   Loaded plugins: fastestmirror, refresh-packagekit, security
   Setting up Install Process
   Loading mirror speeds from cached hostfile
    * base: centos.excellmedia.net
    * extras: centos.excellmedia.net
    * updates: centos.excellmedia.net
   Resolving Dependencies
   --> Running transaction check
   ---> Package bind.x86_64 32:9.8.2-0.47.rc1.el6_8.3 will be installed
   --> Processing Dependency: bind-libs = 32:9.8.2-0.47.rc1.el6_8.3 for package: 32:bind-9.8.2-0.47.rc1.el6_8.3.x86_64
   --> Running transaction check
   ---> Package bind-libs.x86_64 32:9.8.2-0.47.rc1.el6 will be updated
   --> Processing Dependency: bind-libs = 32:9.8.2-0.47.rc1.el6 for package: 32:bind-utils-9.8.2-0.47.rc1.el6.x86_64
   ---> Package bind-libs.x86_64 32:9.8.2-0.47.rc1.el6_8.3 will be an update
   --> Running transaction check
   ---> Package bind-utils.x86_64 32:9.8.2-0.47.rc1.el6 will be updated
   ---> Package bind-utils.x86_64 32:9.8.2-0.47.rc1.el6_8.3 will be an update
   --> Finished Dependency Resolution

   Dependencies Resolved

   ======================================================================================================================================
    Package                      Arch                     Version                                        Repository                 Size
   ======================================================================================================================================
   Installing:
    bind                         x86_64                   32:9.8.2-0.47.rc1.el6_8.3                      updates                   4.0 M
   Updating for dependencies:
    bind-libs                    x86_64                   32:9.8.2-0.47.rc1.el6_8.3                      updates                   890 k
    bind-utils                   x86_64                   32:9.8.2-0.47.rc1.el6_8.3                      updates                   187 k

   Transaction Summary
   ======================================================================================================================================
   Install       1 Package(s)
   Upgrade       2 Package(s)

   Total download size: 5.0 M
   Downloading Packages:
   (1/3): bind-9.8.2-0.47.rc1.el6_8.3.x86_64.rpm                                                                  | 4.0 MB     03:45
   (2/3): bind-libs-9.8.2-0.47.rc1.el6_8.3.x86_64.rpm                                                             | 890 kB     00:35
   (3/3): bind-utils-9.8.2-0.47.rc1.el6_8.3.x86_64.rpm                                                            | 187 kB     00:08
   --------------------------------------------------------------------------------------------------------------------------------------
   Total                                                                                                  19 kB/s | 5.0 MB     04:32
   Running rpm_check_debug
   Running Transaction Test
   Transaction Test Succeeded
   Running Transaction
     Updating   : 32:bind-libs-9.8.2-0.47.rc1.el6_8.3.x86_64                                                                         1/5
     Updating   : 32:bind-utils-9.8.2-0.47.rc1.el6_8.3.x86_64                                                                        2/5
     Installing : 32:bind-9.8.2-0.47.rc1.el6_8.3.x86_64                                                                              3/5
     Cleanup    : 32:bind-utils-9.8.2-0.47.rc1.el6.x86_64                                                                            4/5
     Cleanup    : 32:bind-libs-9.8.2-0.47.rc1.el6.x86_64                                                                             5/5
     Verifying  : 32:bind-utils-9.8.2-0.47.rc1.el6_8.3.x86_64                                                                        1/5
     Verifying  : 32:bind-libs-9.8.2-0.47.rc1.el6_8.3.x86_64                                                                         2/5
     Verifying  : 32:bind-9.8.2-0.47.rc1.el6_8.3.x86_64                                                                              3/5
     Verifying  : 32:bind-libs-9.8.2-0.47.rc1.el6.x86_64                                                                             4/5
     Verifying  : 32:bind-utils-9.8.2-0.47.rc1.el6.x86_64                                                                            5/5

   Installed:
     bind.x86_64 32:9.8.2-0.47.rc1.el6_8.3

   Dependency Updated:
     bind-libs.x86_64 32:9.8.2-0.47.rc1.el6_8.3                        bind-utils.x86_64 32:9.8.2-0.47.rc1.el6_8.3

   Complete!
Step: 2 Create Zones in named.conf File
So we have installed all required Packages, Now we need to configure the main configuration file of the DNS Server i.e. named.conf to create Forward and Reverse Zones, So follow the below steps to do the same.
Now we have to do the required changes in named.conf as per our network and need to create zones by using the decided domain name.
Here below I have mentioned my named.conf file and Highlighted all required changes I did in Blue Color.
[root@localhost ~]# nano /etc/named.conf # Edit the configuration file
   //
   // named.conf
   //
   // Provided by Red Hat bind package to configure the ISC BIND named(8) DNS
   // server as a caching only nameserver (as a localhost DNS resolver only).
   //
   // See /usr/share/doc/bind*/sample/ for example named configuration files.
   //

   options {
    listen-on port 53 { 127.0.0.1; 192.168.1.100; };   # IP Address of the Master DNS Server
           listen-on-v6 port 53 { ::1; };
           directory "/var/named";
           dump-file "/var/named/data/cache_dump.db";
           statistics-file "/var/named/data/named_stats.txt";
           memstatistics-file "/var/named/data/named_mem_stats.txt";
           allow-query     { localhost; 192.168.1.0/24; };  # Allow query in mentioned Subnets
           recursion yes;

           dnssec-enable yes;
           dnssec-validation yes;

           /* Path to ISC DLV key */
           bindkeys-file "/etc/named.iscdlv.key";

           managed-keys-directory "/var/named/dynamic";
   };

   zone "." IN {
    type hint;
           file "named.ca";
   };

   include "/etc/named.rfc1912.zones";
   include "/etc/named.root.key";


   ### itsmarttricks Internal Zones ###

      ### Forward Zone ###

      zone "itsmarttricks.com" IN {           # Domain Name
              type master;
              file "itsmarttricks.com.for";   # Name of the Forward Zone File
              allow-update { none; };
      };

      ### Reverse Zone ###

      zone "1.168.192.in-addr.arpa" IN {   # IP Address
              type master;
              file "itsmarttricks.com.rev";   # Name of the Reverse Zone File
              allow-update { none; };
      };
After configuring the named.conf file we can check if all the syntax is properly written or not by below command.
[root@localhost ~]# named-checkconf /etc/named.conf
Note: named-checkconf command will not give any output if all syntax is proper, otherwise it will give an error message.
Step : 3 Configure the ZoneFiles
As shown above we have configured named.conf file and created our Forward & Reverse Zones, Now we have to create Zone files as mentioned in Zones i.e. for Forward Zone it’s “itsmarttricks.com.for” and for Reverse Zone it’s “itsmarttricks.com.rev“, So follow the below steps to do the same.
To Create Zone files we have to copy some sample files as per our zone name which is located at /var/named.
So copy the named.localhost file as itsmarttricks.com.for for Forward Zone & named.loopback as itsmarttricks.com.rev for Reverse Zone as shown below.
   [root@localhost ~]# cd /var/named/
   [root@localhost named]# ls -l
   total 28
   drwxrwx---. 2 named named 4096 Nov  2 08:53 data
   drwxrwx---. 2 named named 4096 Nov  2 08:53 dynamic
   -rw-r-----. 1 root  named 3171 Jan 11  2016 named.ca
   -rw-r-----. 1 root  named  152 Dec 15  2009 named.empty
   -rw-r-----. 1 root  named  152 Jun 21  2007 named.localhost
   -rw-r-----. 1 root  named  168 Dec 15  2009 named.loopback
   drwxrwx---. 2 named named 4096 Nov  2 08:53 slaves
   [root@localhost named]# cp named.localhost itsmarttricks.com.for
   [root@localhost named]# cp named.loopback itsmarttricks.com.rev
As shown above, we have created our zone files in /var/named, Now we have to Configure both zone file as per our requirement, So follow the below steps.
First, we are going to Configure the Forward Zone.
Before Configuration, the file would look like this as shown below.
   $TTL 1D
   @       IN SOA  @ rname.invalid. (
                                           0       ; serial
                                           1D      ; refresh
                                           1H      ; retry
                                           1W      ; expire
                                           3H )    ; minimum
           NS      @
           A       127.0.0.1
           AAAA    ::1
After Configuration the file would look like as shown below :
   $TTL    86400
   @       IN      SOA     ns1.itsmarttricks.com. [email protected]. (
                           2010031403  ; serial
                           3600        ; refresh
                           1800        ; retry
                           604800      ; expire
                           86400 )     ; minimum


   ; name servers

   @                       IN NS   ns1.itsmarttricks.com.

   ; name server A records

   ns1                      IN  A   192.168.1.100
   itsmarttricks.com.   IN  A   192.168.1.100

   ; mail exchanger record (MX record)

                              IN MX 5 ns1.itsmarttricks.com.

   ; host and canonical name records

   mail                    IN CNAME ns1.itsmarttricks.com.
   www                   IN A     192.168.1.100
   ftp                      IN A     192.168.1.100
After configuring the itsmarttricks.com.for file we can check if all the syntax is properly written or not by below command.
   [root@localhost ~]# named-checkzone itsmarttricks.com /var/named/itsmarttricks.com.for
   zone itsmarttricks.com/IN: loaded serial 2010031403
   OK
Now let’s configure the Reverse Zone.
Before Configuration, the file would look like this as shown below.
   $TTL 1D
   @       IN SOA  @ rname.invalid. (
                                           0       ; serial
                                           1D      ; refresh
                                           1H      ; retry
                                           1W      ; expire
                                           3H )    ; minimum
           NS      @
           A       127.0.0.1
           AAAA    ::1
           PTR     localhost.
After Configuration the file would look like as shown below :
   $TTL    86400
   @       IN      SOA   ns1.itsmarttricks.com. [email protected] (
                           2010031402    ; serial
                           28800    ; refresh
                           14400    ; retry
                           3600000    ; expire
                           86400 )    ; minimum

   ; name servers
               IN      NS      ns1.itsmarttricks.com.

   ; name server A records

   ns1        IN      A       192.168.1.100

   ; PTR records

   100      IN     PTR      ns1.itsmarttricks.com.
After configuring the itsmarttricks.com.rev file we can check if all the syntax is properly written or not by below command.
   [root@localhost ~]# named-checkzone itsmarttricks.com /var/named/itsmarttricks.com.rev
   zone itsmarttricks.com/IN: loaded serial 2010031402
   OK
Zonefile Records with Explanation :
- SOA – Start of authority
- NS – name server
- A – host record (name to IP)
- IN – internet type of record
- CNAME – canonical name (alias)
- MX – mail exchange
root.ns1.itsmarttricks.com. – The email address of the responsible person to whom u can email about the DNS query.
Serial – it is given for the slave DNS server when the slave DNS server contacts the master DNS server for updatation. it looks for this Serial Number. If the master DNS server is having a greater serial number than a slave, then the only slaves will download those changes on the slave DNS server.
3H – Refresh Rate: After every 3 hours slave will contact the master DNS server for updations.
5M – Retry: if the slave is not able to contact master DNS then after 15 minutes it will retry to contact master DNS server for updations.
1W – Information that is available with slave will expire after 1 week.
TTL 86400 – ( Time to live cache information ) – Cache Information with master DNS server will expire after 86400 seconds.
PTR – pointer records mean IP to name resolutions.
Now change the ownership of the file to root.named by using chown command as shown below.
   [root@localhost ~]# chown root.named /etc/named.conf
   [root@localhost ~]# chown root.named /var/named/itsmarttricks.com.for
   [root@localhost ~]# chown root.named /var/named/itsmarttricks.com.rev
As shown below all files i.e. named.conf, itsmarttricks.com.for, itsmarttricks.com.rev are owned by root.named.
   [root@localhost ~]# ls -l /etc/named.conf
   -rw-r-----. 1 root named 1484 Jan  1 07:03 /etc/named.conf

   [root@localhost ~]# ls -l /var/named/itsmarttricks.com.for
   -rw-r-----. 1 root named 542 Jan  1 09:17 /var/named/itsmarttricks.com.for

   [root@localhost ~]# ls -l /var/named/itsmarttricks.com.rev
   -rw-r-----. 1 root named 347 Jan  1 09:25 /var/named/itsmarttricks.com.rev
Now Start the DNS Service.
   [root@localhost ~]# /etc/init.d/named start
   Generating /etc/rndc.key:                                  [  OK  ]
   Starting named:                                            [  OK  ]
We have to start the DNS service at a startup to start the service automatically when we restart the server, follow the below step to do the same.
   [root@localhost ~]# chkconfig --level 35 named on
   [root@localhost ~]# chkconfig --list named
   named           0:off 1:off 2:off 3:on 4:off 5:on 6:off
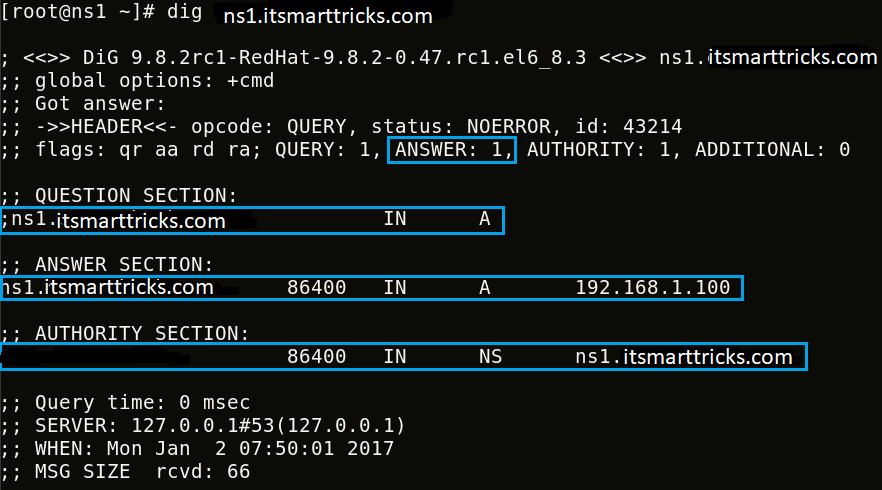
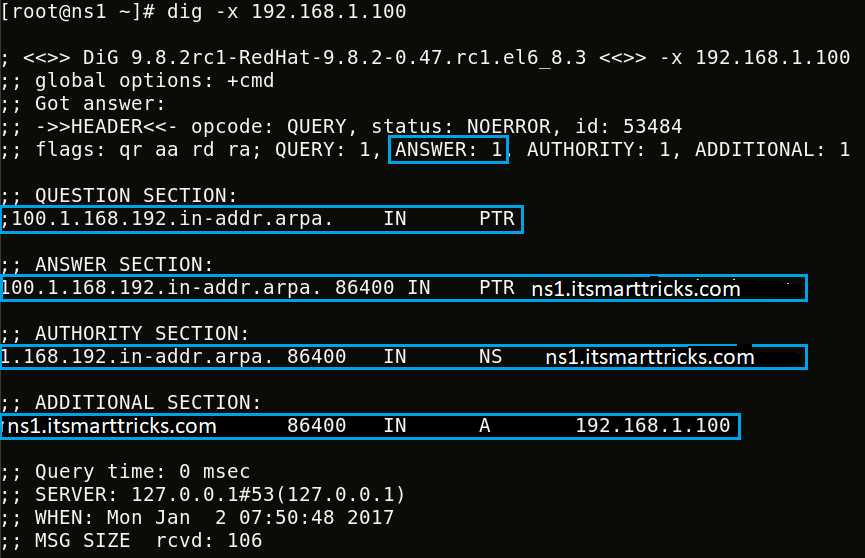
So we have successfully configured the BIND DNS Service, Now it’s time for testing., We have tools like dig, nslookup to check the DNS service working status. So the Command would look like as mentioned below.
dig <FQDN ( Fully Qualified Domain Name/IP Address )> i.e. dig ns1.itsmarttricks.com

Now let’s check for IP Resolution i.e. dig -x 192.168.1.100

We can use the nslookup command to check DNS Service is working properly or not as shown below.
   [root@localhost ~]# nslookup itsmarttricks.com
   Server:  127.0.0.1
   Address: 127.0.0.1#53

   Name: itsmarttricks.com
   Address: 192.168.1.100

   [root@localhost ~]# nslookup ns1.itsmarttricks.com
   Server:  127.0.0.1
   Address: 127.0.0.1#53

   Name: ns1.itsmarttricks.com
   Address: 192.168.1.100

   [root@localhost ~]# nslookup 192.168.1.100
   Server:  127.0.0.1
   Address: 127.0.0.1#53

   100.1.168.192.in-addr.ar pa name = ns1.itsmarttricks.com.
So everything looks good and the Master/Primary DNS Server is working fine as shown on the testing output above. on our next article I will explain How to Configure Slave DNS Server till then stay tuned to itsmarttricks.com.
That’s all, In this article, we have explained How to Setup Master/Primary DNS Server with Bind in Redhat/Centos/Fedora. I hope you enjoy this article. If you like this article, then just share it. If you have any questions about this article, please comment.